This tutorial was written by me on August 20th, 2006.
Any resemblance to any other tut is purely coincidence.
You may print this tutorial for your own use. Also, you may use the URL to link to another page, but do hot hotlink anything on this page to your site. Thank you.
OK, let's get started.
This was done in PSP 9, but you should be able to do it in any version.
Here's what you'll need.
Paint Shop Pro. You can go here to download a trial version:
A tube of your choice.
The following Brushes (Not made by me.)
Place these in the folder that you use for your PSP Brushes.
Open up a new transparent canvas 400 x 400 in size. (Or any size of your choice. You can resize later.)
Pick a matching color from your tube and select that for your Foreground color. Using the Preset Rectangle Tool, set your background to Null. Set your Line Width to 10. Draw a rectangle in the center of your canvas, leaving about 1/2 inch on each side. Align it to the center of the canvas or place it where you'd like if you choose to off set it a bit.
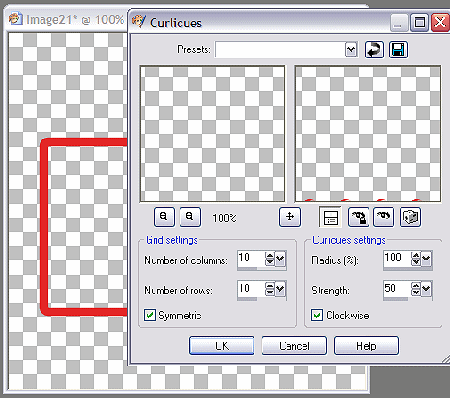
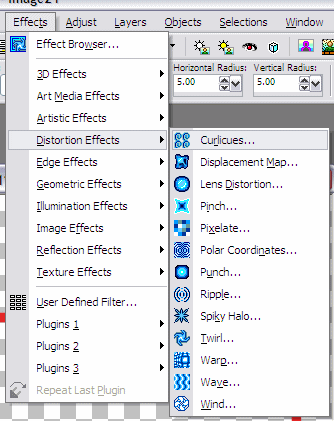
Go to Effects, Curlicues...and use the setting shown on the 2nd template
Go back to Effects, Distortion and this time, choose Twirl. Change to 720 degrees and hit OK.
Go back to Effects, Distortion, choose Wind. Check from Right with a Wind Strength of 75 and click OK.
Duplicate this layer and mirror. Merge down the two swirl layers into one. Lower the Opacity to 70.
New Layer and bring to bottom. Flood fill this with White. Merge Visible.
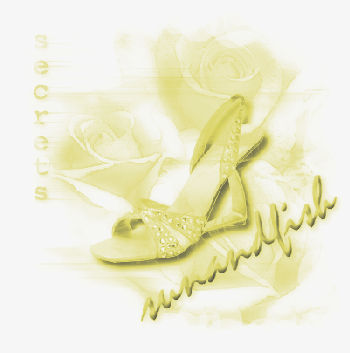
New Raster Layer and add a tube of your choice toward the Middle Right of your tag and lower the opacity to 70. With this Layer still active, Choose paint brush and find the agi_tx_roses01 brush. With a size of 470, put the right edge to match the edge of the tag, placing it up or down where you'd like and click once. (Your color for the rectangle should still be active.)
Now find the brush called agi_wb_secrets and follow the same step, placing it near the top left of the tag, but over enough so it still shows if you add an edge effect.
Merge the layers visible.
Go to Image, Picture Frame and choose an edge effect of your choice. I used one called Edge Circles. Make sure you can see your word, "Secrets". If not, use the undo button and re-position it.and then add your edge effect again.
Merge visible, again.
Hit your Text Tool and using your chosen color, type what ever you want.
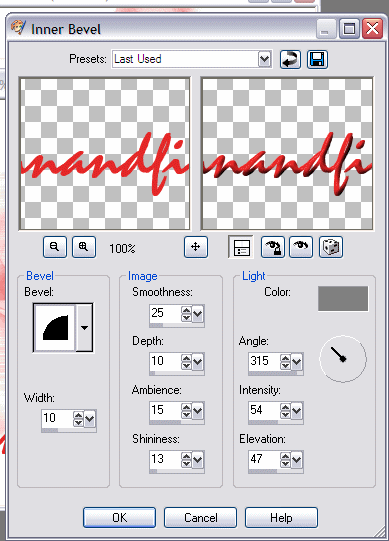
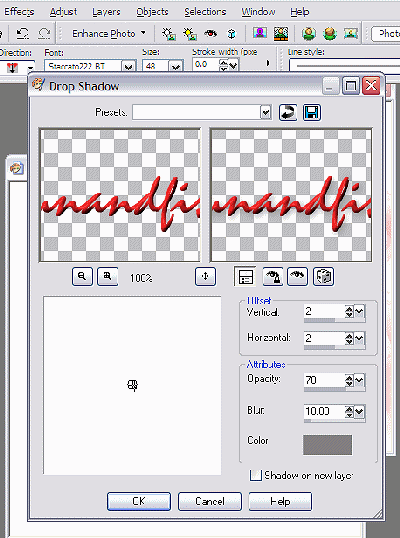
Go to Effects, 3-D effects and Inner Bevel using these settings: - And Drop Shadow at these settings:
Or any setting of your choice. I find this setting makes a nice 3-D like text, but it's always fun to experiment with what you like to do.
Drop the Opacity to 75.
Merge everything visible and re-size to your choice.
I hope you have enjoyed this tut. The possibilities are endless!


